Tuesday, December 30, 2008

Subsequent Alert Issue when Major and Minor versions are turned on

Consider the following scenario:

- We have a document library with the following settings:
o Name – Major and Minor Version – Alert Issue
o Permission – Unique Permissions. We have broken the permissions and the library no longer inherits the permissions from the top level site collection.

- We now add a user to the top level site with Read Permissions
- The same user is added to the document library with Read permissions
- For a better clarification, following is the versioning settings for the document library:
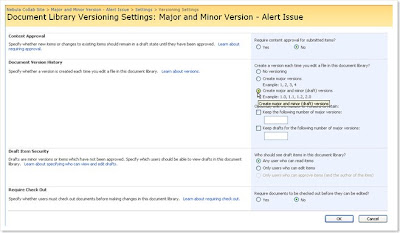


- Now the user with Read permission logs on to the site and subscribe for an Alert for the document library. The user gets the initial alert email about the alert being created for the Document Library.
- To distinguish, I have the site admin logged in to the document library and create a alert for him. The site admin now uploads a new document to the document library.
- We see that the user with Read only permissions does not get a subsequent alert, but the site admin does.

Conclusion:
If the user has Read permissions over a document library and if the document library has “Major and Minor” versioning turned on, then the user with the read permission will not get an alert.
This is a by-design issue.


Work-Arounds:
- Turn Off Major and Minor versioning and either keep Major versioning on or Minor versioning on, but not both.
- Give the user edit permission over the document library. This can be done either by assigning Contribute permission to the user or by editing the permission levels for the site.


Reason:
The user only has read permission and not edit permission over the library and its items. When a new item is inserted, the document is saved as draft and now published on the site. Thus, the document is not final. Thus, the user will not get an alert. But for the user who has edit permission, can approve the document and thus need to be notified about the document change so that the user can approve/reject the draft version.

Error: New Document Requires a Windows SharePoint Services-compatible application and Microsoft Internet Explorer 6.0 or greater

I started off with installing Microsoft Office SharePoint 2007 in my development environment. Just to be sure that I do have any bugs or issues, I installed MOSS and WSS SP1. When I started this blog, I created a category of “Office Integration”. On that basis, I tried creating a new site and in the document library uploaded a new Word 2007 document. I clicked on the document drop-down menu and tried to open the document in Microsoft Office Word application and got the following error message :

‘New Document’ requires a Windows SharePoint Services-compatible application and Microsoft Internet Explorer 6.0 or greater. To add a document to this document library, click on ‘Upload Document’ button


Error - WSS SharePoint Compatible 893698

Now I have checked the Office Version and the internet Explorer version and both were meeting the SharePoint requirements. IE was 6.0.1 and Office 2007 Enterprise Edition. I was a bit confused and did not know how to go ahead. Because, the basic Office applications were not integrated with SharePoint.

Here is what I did to resolve the issue:

1. Go to Add/Remove Programs and select Microsoft Office 2007 -> Click on the “Change” button


2. On the next screen select “Add or Remove Features” and click on the “Continue” button


3. On the next screen, select “Office tools” drop down. The problem here is that Windows SharePoint Services Support files are not installed with Office application. Thus, we need to select them Windows Sharepoint Services Support tools from the drop down and make sure that select “Run from My Computer” or “Run All from My Computer” options.


4. Allow the setup to complete


This should most probabaly do the trick. Even after doing the above things, you do not resolve the issue or if you are using another version of Office, I would request you to go to the following KB article and then resolve the issue as per the product version.

http://support.microsoft.com/kb/893698/en-us

Admin Jobs failing on the SharePoint Servers

Administration jobs means the timer jobs that are executed on regular basis on the SharePoint Server. They range from Alert processing, Synchronization, etc. To get the complete timer job list for the farm, browse to Central Administration -> Operations -> Timer jobs

If you see any failed job in the timer jobs status, the first thing that you might try is running the following command on all the servers :

stsadm -o execadmsvcjobs

The above command will try and execute the timer jobs that are stuck/scheduled for the specific time when you run that command. There are possibilities like the stsadm command is stuck and shows “Executing….” in the command prompt after you attempt to run the above command.

To run the above command successfully, follow the below troubleshooting steps :

Open Central Administration -> Operations -> Diagnostic Logging
Select “All” under the jobs and set the Error logging to Verbose.
Try to execute the execadmsvcjobs command.

Open the log file under “C:\Program Files\Common Files\Microsoft Shared\Web Server Extensions\12\Logs” . This is the default log directory. It might be possible that the logs directory is changed by the administrator who has set up SharePoint. We can check the logs settings from Central Administration -> Operations -> Diagnostic logging.

Open the file in MS Excel -> Apply filters for the columns -> Under the Levels column, select “high” and “verbose”. Under the category column, select “Timer” and “Unified Logging Service”

Check for any errors that you get there.
Based upon errors, we need to further troubleshoot the issue.

The possible errors that you might get are :

1. The previous instance of the timer job ‘Application Server Administration Service Timer Job’, id ‘{12403D5C-D18B-4D06-9E2F-C2855E30385C}’ for service ‘{83A518CA-9139-4A50-999B-6C35E4D42A34}’ is still running, so the current instance will be skipped. Consider increasing the interval between jobs.

2. Error during Encrypting Decrypting.


If you get the above two errors, they probably are related. This issue normally occurs where you have multiple server farm configuration. The first error says that there is an admin jobs that is not getting executed. As the job is stuck, we need to remove that job from the config so that other jobs can be executed. Run the following two commands to check if it is a ssp timer jobs or a admin timer job that is listed :

stsadm -o deletessptimerjob -id “12403D5C-D18B-4D06-9E2F-C2855E30385C”

If the above command says that there is no ssp timer jobs listed with the above ID, run the following command to delete the object with that id :

stsadm -o deleteconfigurationobject -id “12403D5C-D18B-4D06-9E2F-C2855E30385C”

This will remove the timer job that was stuck. Now try and execute stsadm -o execadmsvcjobs on the other servers and you might get the second error that I have listed above. The Encryption/Decryption error states that for some reason, the password used by the timer service on that server is not valid.

Open Services.msc on the server where you are getting the error and re-enter the log on credentials for the “Windows SharePoint Services Timer”. Run the following command to update the username and password for the timer service account :

stsadm -o updatefarmcredentials -userlogin “domain\username” -password “xxxxxxx” -local

NOTE: For the complete list for updating the farm credentials follow this kb :http://support.microsoft.com/kb/934838/en-us

Run the stsadm -o execadmsvcjobs on the server where you were getting the errors and this time it will run succesfully. If you face any further problems, or other error messages, please leave a comment and I should get back to you soon.

Maximum File Size for Crawling

By default, Search Services can crawl and filter a file with a size of up to 16 megabytes (MB). It will always crawl the first 16MB of a file. After this limit is reached, SharePoint Portal Server enters a warning in the gatherer log "The file reached the maximum download limit. Check that the full text of the document can be meaningfully crawled."

To increase the limit of 16 MB, you must add in the registry new entry MaxDownloadSize. To do this, follow these steps:

1. Start Registry Editor (Regedit.exe).

2. Locate the following key in the registry:

HKEY_LOCAL_MACHINE\SOFTWARE\Microsoft\Office Server\12.0\Search\Global\Gathering Manager

3. Open Edit - New - DWORD Value. Name it MaxDownloadSize.

4. Double-click, change the value to Decimal, and type the maximum size (in MB) for files that the gatherer downloads.

5. Restart the server.

6. Start Full Crawl.

NOTE: Increasing the file size may cause a timeout exception because the crawler can timeout if the file takes too long to crawl/index (because of its size). To increase timeout value, follow these steps:

1. In Central Administration, on the Application Management tab, in the Search section, click Manage search service.

2. On the Manage Search Service page, in the Farm-Level Search Settings section, click Farm-level search settings.

3. In the Timeout Settings section change Connection and Request acknowledgement time.

SQL databases used in SharePoint

There are quite a number of databases generated during a Sharepoint install and depending on the "Farm" configuration there might be more or less. A lot of SQL DBA's get quite annoyed when all these databases suddenly appear in their system and they have no idea what each database does or why it is there.

I have therefore decided to explain what databases get created during a MOSS install and what the purpose is behind each. A WSS install generates less databases and therefore I decided to focus on a MOSS install as this generates the most.

Lets start by taking a look at a screen shots of the databases generated and then I will explain the purpose of each.

• Config Database for the Farm - Sharepoint_Config - stores configuration information about the servers deployed in the farm , their individual configurations settings and some security information. Without this database there is no Sharepoint.

• Content database for the Admin Console - Sharepoint_AdminContent_GUID - sharepoint uses its own technology to render the web based admin console for Sharepoint. Therefore it needs it's own content database to stored the configuration settings for the web parts used. The actual data configured using this console is stored in the config database for the farm. The name for this database is system generated and cannot be controlled during the installation process and therefore it ends with a GUID.

• Config database for the SSP (Shared Service Providers) - BPS_SharedServices_DB - during the configuration process a SPP is defined to configure all the Shared Services used by Sharepoint. All the Configuration settings for these services are stored in this database. The name of the database can be controlled during the creation process and should be descriptive of the purpose.

• Content database for the SSP Console - BPS_SSP_Content - just like the admin console the SSP also needs a web site to allow you to configure the shared services and these also use web parts and lists. Therefore the SSP also needs its own content database to store these settings.

• SSP Search database - BPS_SharedServices_Search_DB - this database is used by the Enterprise search service to store metadata about the information crawled including security information. This is typically used for information stored external from Sharepoint.

• WSS search database - WSS_Search_sps-dc1 - this database is used by the WSS core components to store metadata about content stored inside the Sharepoint web application content databases. This is created during the installation process.

• Web Application Content - Office_Content - this is the content database for the first user based web site in Sharepoint. Before the users can actually use Sharepoint a "Web Application", Site Collection and Site must be built. This database stores all the information generated within this web application.

• Additional content databases - Office_Content_2 - new content databases can be created to host additional "Site Collections" and "Web Applications" and there could be hundreds of these.

The other databases that are left over in the snapshot is used by other applications that do not have a direct influence on Sharepoint, but can be used in conjunction with the product.

• SQL Server system databases and sample databases
• Project Server 2007 databases
• Live Communication Server 2005 databases.
• Reporting Services databases.

How to create a ‘Slipstream’ installation for MOSS with SP1 on Windows Server 2008

In order to install MOSS 2007 on Windows Server 2008 you will need to install 'MOSS with Service Pack 1' (this includes WSS with Service Pack 1). This is known as a slipstream installation and it contains the original image for MOSS/WSS RTM and the MOSS/WSS SP1 files. The problem is that this 'all in one' slipstream for MOSS is not available for download just yet, so you have to create your own slipstream image. Fortunately, this is very easy to do, just follow these steps:

1- Download MOSS and WSS Service Pack 1 files
You can download the MOSS and WSS SP1 files from here. You will need both service packs for a MOSS installation:
WSS SP1: http://www.microsoft.com/downloads/details.aspx?FamilyID=4191a531-a2e9-45e4-b71e-5b0b17108bd2&DisplayLang=en
MOSS SP1: http://www.microsoft.com/downloads/details.aspx?FamilyID=ad59175c-ad6a-4027-8c2f-db25322f791b&DisplayLang=en
Once downloaded you will have two executable files: Wssv3sp1-kb936988-x86-fullfile-en-us.exe and Officeserver2007sp1-kb936984-x86-fullfile-en-us.exe

2 - Extract the exe's
You now need to extract the exe's, to do this enter this command (this assumes you've downloaded the exe's to your c:\, change if not)
C:\Wssv3sp1-kb936988-x86-fullfile-en-us.exe /extract:c:\wsssp1extract
C:\Officeserver2007sp1-kb936984-x86-fullfile-en-us.exe /extract:c:\mosssp1extract

3 - Add the extracted files to your RTM MOSS installation
Once you've extracted the service pack exe's you need to copy the extracted contents to the /Updates folder on the MOSS CD. The easiest way to do this is take a copy of your MOSS RTM CD (or extract your ISO image) onto your file system and simply copy the contents of both c:\wsssp1extract and c:\mosssp1extract into the \Updates folder (both the WSS and MOSS service pack files go into the same folder, do not use sub-folders)..

You're done; you will now be able to install MOSS as usual on your Windows Server 2008 machine.

How to Rename a SharePoint 2003 Sub Site Using SMIGRATE

There is no option to right-click and rename a site but the SMIGRATE utility makes the process quite painless.

There are a number of ways to do this, but if we want performing a full rename (making the site identical – same name, same content, etc) we will need to use the SMIGRATE tool.

Steps:

On our front end web server, open a command prompt.
Type cd %systemdrive%\program files\common files\microsoft shared\web server extensions\60\bin
Perform the backup by typing Smigrate –w http://server/sites/site1 -f d:\migrationfolder\Backup.fwp –u vcn\it-got-spdbadmin –pw !m00nb00ts
To remove the original site type stsadm –o deletesite –url http://server/sites/site1
Now we are ready to restore to our new site name, type the following in the command prompt Smigrate –r –w http://server/sites/site2 -f d:\migrationfolder\Backup.fwp –u contoso\Administrator –pw P@ssw0rd1

We have now successfully restored the original site into a new site collection, with a new name

How Rename a SharePoint 2007 Site with STSADM

Unfortunately, there is no option to right-click and rename a site but the STSADM utility makes the process quite painless.

There are a number of ways to do this, but if we want performing a full rename (making the site identical – same name, same content, etc) we will need to use the STSADM tool.

Steps:

On our front end web server, open a command prompt.
Type cd %systemdrive%\program files\common files\microsoft shared\web server extensions\60\bin
Perform the backup by typing stsadm –o backup –url http://server/sites/site1 -overwrite -filename %systemdrive%\backup.dat
If we are planning on restoring the site to the same virtual server (the same content database) we will now need to delete the original site. We need to do this due to the following:


About GUIDs and Restoring Site Collections If we attempt to restore a backup of a site collection more than once to the same content database, we may get the following error message: “No content databases are available for restoring this site collection. Create a new content database and then try the restore operation again.” This is because the globally-unique identifiers (GUID) for lists are preserved in the backup file and reused during restore, but the content database requires list GUIDs to be unique. Therefore, we cannot restore a site collection twice to the same content database, and must instead use a different content database.


Now that we have that sorted out, we can perform this optional step (we would generally want to do this)
To remove the original site type stsadm –o deletesite –url http://server/sites/site1
Now we are ready to restore to our new site name, type the following in the command prompt
stsadm –o restore –url http://server/sites/site2 -filename %systemdrive%\backup.dat
We have now successfully restored the original site into a new site collection, with a new name.

SharePoint 2007: Default.aspx displayed "HTTP 500 Internal Error"

The 500 - Internal Server Error resolve by re-inheriting the permission levels on the broken site after you have broken them. So to reiterate the full steps for resolving both the permissions and 500 - Internal Server Error, are as follows:


Step 1: From your broken sub-site, go to the '/_layouts/role.aspx' page,

Step 2: Select 'Edit Permission Levels'

Step 3: Then from the same page, click the 'Inherit Permission Levels' button.


Close the Internet Explorer and again open the site. Now your site will be working fine.


Example:

http://site/sub-site/broken-site. I inherited permission levels at http://site/sub-site. Now any site under 'sub-site' I get the 500 - Internal Server Error without going directly to the 'default.aspx' and the sites Permission Inheritance on the broken sites can no longer be broken from the parent. You simply get a 'Cannot Complete this Action' Error.

On the broken sub-site, you must first break the 'permission level' inheritance. To do so, you have to know the URL. So for our example broken sub-site, we would have to go to http://site/sub-site/broken-site/_layouts/role.aspx then select 'Edit Permission Levels'. Then from the same page, click the 'Inherit Permission Levels' button.


Close the Internet Explorer and again open the site. Everything will be working fine.

Your site should no longer display the 500 - Internal Server Error nor should you no longer be able to edit permissions.